Simplifying Step Functions and Stepwise: Lessons Learned and a New Approach

At Motiva, we use AWS Step Functions to manage all of our workflows. To make this simpler, we developed Stepwise, an open-source Clojure library that helps us coordinate various tasks like business processes, data pipelines, and even our machine learning workflows. By using Step Functions, we can effortlessly handle complex event-driven processes and monitor our operations. Although we have been using Step Functions and Stepwise in production for a couple years, we identified some areas where we can improve the developer experience. This post will share some bottlenecks we discovered and propose a new and improved version of a Step Functions library, but with Clojure all the way.

What do we mean Clojure all the way? We have been designing a new interface to define Step Functions state machines, which we will illustrate with an example of a pizza-making workflow. To create this state machine on AWS Step Functions, we would use the following code:

(def pizza-making-state-machine
  (sfn/->> request
           (sfn/parallel (make-dough)
                         (make-sauce)
                         (sfn/map {:iterate-over :ingredients} prepare-ingredients))
           (put-ingredients-on-dough)
           (bake)
           (sfn/wait 2 :minutes)
           (sfn/choice (comp not is-pizza-acceptable?)
                       ;; branch off to this fn if condition is true
                       (sfn/fail))
           (serve)))

(sfn/ensure-state-machine client :pauls-pizza-making-machine pizza-making-state-machine)

This looks like normal Clojure code, but it is actually a workflow. This is because AWS Step Functions keeps the state of your workflow at all times. So, if your server, processes, or any of your workers go down during any workflow execution, your execution will continue where it left off once your system comes back online.

Step Functions diagram for pizza-making-state-machine

We can define the workers for each step of the workflow in Clojure as follows:

(defn make-dough
  ;; SFN error handling configuration as metadata
  {:retry [{:error-equals     [:sfn.timeout]
            :interval-seconds 60
            :max-attempts     3}]}
  [coll]
  coll)

(defn put-ingredients-on-dough [coll] coll)

(defn bake [coll] coll)

(defn make-sauce [coll] coll)

(sfn/def-choice-predicate-fn is-pizza-acceptable? [m]
  true)

These functions define the steps in the pizza-making workflow. We can choose where to run these workers at runtime using the following code:

(sfn/run-here client
              {make-dough               {:concurrency 2}
               put-ingredients-on-dough {:concurrency 1}
               bake                     {:concurrency 1}})


(sfn/run-on-lambda client
                   {make-sauce {:timeout         40
                                :memory-size     512
                                :max-concurrency 50}})

Since the workers are defined as Clojure functions, we can choose to run them in containers or serverless functions at runtime.

Say, what if make-dough turns out to be an infrequent but bursty process that would be more suitable to run on serverless. But make-sauce takes too long before Lambda times out. We can switch the two like so:

(sfn/run-here client
              {make-sauce               {:concurrency 5}
               put-ingredients-on-dough {:concurrency 1}
               bake                     {:concurrency 1}})


(sfn/run-on-lambda client
                   {make-dough {:timeout         30
                                :memory-size     512
                                :max-concurrency 100}})

At Motiva, we have state machines to manage email delivery, data integration, and machine learning decisions, among others. However, we only have four developers on our team, and we want to improve our speed in delivering quality products with operational excellence. As demand grows and customers ask for more, we're seeing that our speed to orchestrate new business workflows as state machines is crucial to our competitiveness.

To achieve this goal, we plan to simplify our development process by using only one tool, Clojure, instead of using multiple tools like Amazon States Language and Terraform. By doing so, we can focus on delivering value to our customers.

So, what do you think? We're still in the design phase of this new library. If this is something that's of interest to you, please get in touch with me.

Posted 11 May 2023 in computing.

Moving from Lambda to SageMaker for inference

A few years ago, we moved our machine learning inference endpoints to serverless in order to reduce operations upkeep. At that time, AWS Lambda seemed like an obvious choice, as many of our Clojure services were already running on Lambda, and we had a deployment process in place. We used our continuous integration platform to package our applications, upload them to S3, and then deployed resources with Terraform.

However, we faced a new challenge as our machine learning models grew beyond the 250 MB Lambda artifact limit. To resolve this, we needed to update our deployment pipeline to either pack our models as container images on Lambda (which has a more generous 10 GB limit) or find a new solution.

Enter SageMaker Serverless Inference. It offers all the benefits of Lambda with additional conveniences tailored for ML model deployments. One drawback is cost: according to our calculations, 1000 requests on a 2GB memory instance each running for 1 second cost 3.3 cents on Lambda, but 4 cents on SageMaker Serverless Inference. It's a 21% increase, but for a small company like us, the absolute amount is negligible compared to developer time saved.

In this blog post, I'll guide you through the steps of creating and using a SageMaker Serverless Inference endpoint, which we found to be a seamless experience. We're continuously impressed with the ecosystem developing around the MLOps community.

Creating a SageMaker endpoint

We decided to try SageMaker Serverless Inference and re-deployed one of our smallest machine learning models on SageMaker using the instructions from this Hugging Face notebook.

  • create an IAM role with AmazonSageMakerFullAccess policy on your AWS account (ref). Let's call it my_sagemaker_execution_role in this example.

  • create a S3 bucket for SageMaker to upload data, models, and logs:

import sagemaker

sess = sagemaker.Session()
sagemaker_session_bucket = None
if sagemaker_session_bucket is None and sess is not None:
    # set to default bucket if a bucket name is not given
    sagemaker_session_bucket = sess.default_bucket()
  • ensure execution IAM role and default S3 bucket:
try:
    role = sagemaker.get_execution_role()
except ValueError:
    iam = boto3.client("iam")
    role = iam.get_role(RoleName="my_sagemaker_execution_role")["Role"]["Arn"]

sess = sagemaker.Session(default_bucket=sagemaker_session_bucket)
print(f"sagemaker role arn: {role}")
print(f"sagemaker bucket: {sess.default_bucket()}")
print(f"sagemaker session region: {sess.boto_region_name}")
  • create a HuggingFaceModel instance by passing in env as the environment variables. It is important to note that we need to set the optional HF_API_TOKEN value because our model is private on Hugging Face. Hence, we must pass an API token to the environment for the container to successfully pull our private model.
env = {
    "HF_MODEL_ID": "MoritzLaurer/multilingual-MiniLMv2-L6-mnli-xnli",
    "HF_TASK": "zero-shot-classification",
    # "HF_API_TOKEN": HF_API_TOKEN,
}

huggingface_model = HuggingFaceModel(
    env=env,                      # configuration for loading model from Hub
    role=role,                    # iam role with permissions to create an Endpoint
    transformers_version="4.26",  # transformers version used
    pytorch_version="1.13",       # pytorch version used
    py_version="py39",            # python version used
)
  • deploy!
serverless_config = ServerlessInferenceConfig(
    memory_size_in_mb=2048,
    max_concurrency=10,
)

classifier = huggingface_model.deploy(
    serverless_inference_config=serverless_config, endpoint_name="my_demo_sagemaker_endpoint"
)

We really liked the fact that this can all be done in the same Python environment as our model development. This saves us from context switching between Python, Docker, and Terraform. However, we are unsure about using the SageMaker Hugging Face Inference Toolkit, which hides some of the nice features of SageMaker endpoints, such as support for production variants to perform A/B testing on models.

Requesting an inference

Wait for the SageMaker endpoint to be up and running. It takes a few minutes. After this, we can make a request. If you followed through further from the upstream instructions linked above, you can make a request immediately using the object returned from HuggingFaceModel.deploy(). However, in most cases, requests are made from a different process and at a later time. Therefore, we will not have access to the deploy() object at that point. Fortunately, this is easily achievable.

We have a couple of options. We can use the HTTP endpoint directly or leverage SageMakerRuntime. We opted to use SageMakerRuntime because we're already in Python and do not want to go through the process of writing an AWS authentication header for a HTTP request.

import boto3

client = boto3.client("sagemaker-runtime")

# request body for a zero-shot classifier
body = {
    "inputs": "A new model offers an explanation for how the Galilean satellites formed around the solar system’s largest world.",
    "parameters": {
        "candidate_labels": ["space", "microbiology", "robots", "archeology"],
    },
}

response = client.invoke_endpoint(
    EndpointName="my_demo_sagemaker_endpoint", # replace with your endpoint name
    ContentType="application/json",
    Body=json.dumps(body),
)

print(json.loads(response["Body"].read()))

This example request body schema is for a zero-shot classifier. Request bodies for other transformers.pipeline tasks are shown in this Hugging Face notebook.

Lastly, note that SageMaker Serverless endpoint has a concurrent invocation limit of 200 invokes per endpoint, whereas Lambda can handle tens of thousands.

Orchestrating Pizza-Making: A Tutorial for AWS Step Functions with Stepwise

In this post, I will step through creating a AWS Step Functions state machine using Stepwise for a hypothetical pizza-making workflow. Before we get to that though, in case you're wondering why would you care about AWS Step Functions, or application workflow orchestration in general, I discussed our 4-year journey towards an message-based, orchestrated architecture previously.

Let's make some pizzas! Suppose these are the 4 steps to making a tasty Pizza Margherita:

  • make dough
  • make sauce
  • put ingredients on dough
  • bake

And suppose you built some robots to perform each of the step. How would you orchestrate your robots to work together? Well, one option is to use an application workflow orchestration engine. We will be using AWS Step Functions via Stepwise.

Why Stepwise?

Stepwise is our open source library to manage Step Functions using Clojure. Why would you use Stepwise instead of an infrastructure as code (IoC) tool, like CDK or Terraform, to manage Step Functions?

If your workers are written in Clojure, then using Stepwise would help keep your state machine definitions, which is essentially business logic, and application code in one place. Thus, making your development and maintenance experience more seamless. And as you will see in this post, Stepwise has a few features that will make your time working with Step Functions easier too.

Creating a state machine

Let's start easy and create a simple Step Functions (SFN) state machine. Launch a REPL from your local Stepwise repository,

paul@demo:~/stepwise$ lein repl

...

stepwise.dev-repl=>

Paste the following code onto your REPL to create your first state machine on SFN. This assume that your environment is already setup with awscli and that your account has permission to manage SFN.

(require '[stepwise.core :as stepwise])

(stepwise/ensure-state-machine

  :make-pizza ;; name of your state machine

  {:start-at :make-dough

   :states
   {:make-dough {:type     :task
                 :resource :make-pizza/make-dough
                 :next     :make-sauce}

    :make-sauce {:type     :task
                 :resource :make-pizza/make-sauce
                 :next     :put-ingredients-on-dough}

    :put-ingredients-on-dough {:type     :task
                               :resource :make-pizza/put-ingredients-on-dough
                               :next     :bake}

    :bake {:type     :task
           :resource :make-pizza/bake
           :end      true}}})

; output
; "arn:aws:states:us-west-2:111111111111:stateMachine:make-pizza"

We called ensure-state-machine to create a state machine named :make-pizza, specifying 4 states. The states are connected serially with the :next keyword. For information on the important concepts of SFN, AWS provides helpful documentation here.

make pizza step functions, first version

To see what you created on AWS, navigate to your SFN dashboard on AWS and find your make-pizza state machine. The diagram below (from my SFN dashboard) shows the corresponding layout of your make-pizza state machine.

This state machine doesn't do anything yet. We still need to:

  • assign workers to each of the step
  • start an execution

Assign workers to the steps

This is where the magic of Stepwise comes into play. If you're using an IoC tool to manage Step Functions, then you'd have to either create a Step Functions Activity or a AWS Lambda to run your application logic. But with Stepwise, we simply use the stepwise/start-workers! function to subscribe your Clojure functions to the SFN state machine.

Note in the code block below that the key names match the resource names defined in the state machine. Stepwise will automatically create the Step Functions Activity and run your workers in a core.async background process to respond to your Step Functions jobs.

(def workers
  (stepwise/start-workers!
    {;; key names must match one of your state machine resources
     :make-pizza/make-dough
     (fn [_] (println "making dough..."))

     :make-pizza/make-sauce
     (fn [_] (println "making sauce..."))

     :make-pizza/put-ingredients-on-dough
     (fn [_] (println "putting on ingredients..."))

     :make-pizza/bake
     (fn [_]
       (println "baking...")
       :done)}))

; output
; #'stepwise.dev-repl/workers

Run an execution

WARNING: there might be some AWS cost incurring to follow through with this tutorial from this point forward.

We have our pizza-making state machine defined. We have our pizza-making workers ready. Let's run this thing once on AWS.

(stepwise/start-execution!! :make-pizza {:input {}})

; output
;{:arn "arn:aws:states:us-west-2:111111111111:execution:make-pizza:242630d3-1b1c-4a76-b3c0-1bac266c29b2"
; :input {}
; :name "242630d3-1b1c-4a76-b3c0-1bac266c29b2"
; :output "done"
; :start-date #inst "2021-10-25T01:28:07.873-00:00"
; :state-machine-arn "arn:aws:states:us-west-2:111111111111:stateMachine:make-pizza"
; :status "SUCCEEDED"
; :stop-date #inst "2021-10-25T01:28:08.807-00:00"}

For Stepwise API, *-!! suffix to a function name denotes blocking calls. *-! denotes non-blocking calls. Similar to core.async convention. We're using the blocking version of start-execution here. There is a corresponding non-blocking start-execution! available.

You might have noticed that we passed in an empty map as input. For sake of simplicity, we're ignoring input and output entirely in this tutorial. Everybody is getting the same Pizza Margherita.

Operational features

As discussed in my previous post, one of the main benefits of using an application workflow orchestration engine instead of rolling your own are the provided operational features. I'll show a couple examples that I find the most useful. Execution history and error handling.

Execution history

Step Functions keep track of every one of your executions. One of the ways to access that logs is to use the AWS Console. On the make-pizza state machine view, you can see your list of execution history.

AWS Console execution history

Not only do you get a high-level list of executions, you have access to detailed history of each of your execution with input and output information for each step within the state machine, as well as information of each state transitions.

Handling errors

Our robots can be prone to failure. What happens if one of them fail? Let's say the dough-making robot fails some of the time. One of the ways to handle that is to retry the task upon failure. Let's add a retry logic to our state machine definition.

{:make-dough {:type     :task
              :resource :make-pizza/make-dough
              :retry [{:error-equals     :States.TaskFailed
                       :interval-seconds 30
                       :max-attempts     2}]
              :next     :make-sauce}}

We've configured :make-pizza/make-dough worker to retry a second attempt after 30 seconds if a task fail.

State machine control flow

Guess what? Your Pizza Margheritas are in high demand. We want to save some time in your workflow by making the dough and sauce simultaneously. We can do that with a Parallel state provided by SFN.

Putting all of these together, here is our final state machine definition with re-try for make-dough worker and simultaneous runs for make-dough and make-sauce workers.

(stepwise/ensure-state-machine
  :make-pizza
  {:start-at :make-base

   :states
   {:make-base
    {:type     :parallel
     :branches [{:start-at :make-dough
                 :states   {:make-dough
                            {:type     :task
                             :resource :make-pizza/make-dough
                             :retry    [{:error-equals     :States.TaskFailed
                                         :interval-seconds 30
                                         :max-attempts     2}]
                             :end      true}}}

                {:start-at :make-sauce
                 :states   {:make-sauce
                            {:type     :task
                             :resource :make-pizza/make-sauce
                             :end      true}}}]
     :next :put-ingredients-on-dough}

    :put-ingredients-on-dough {:type     :task
                               :resource :make-pizza/put-ingredients-on-dough
                               :next     :bake}

    :bake {:type     :task
           :resource :make-pizza/bake
           :end      true}}})

make pizza step functions, second version with control flow

This definition is getting a bit involved. The flow diagram representation is easier to understand what's happening.

Worker concurrency

Let's scale this workflow further. You built more robots to make pizzas. Let's increase the number of workers for this state machine to make use of the increased capacity. You can define worker concurrency with Stepwise when you call start-workers! by passing in a second argument map containing a task-concurrency key like so.

(def workers
  (stepwise/start-workers!
    {:make-pizza/make-dough
     (fn [_] (println "making dough..."))

     :make-pizza/make-sauce
     (fn [_] (println "making sauce..."))

     :make-pizza/put-ingredients-on-dough
     (fn [_] (println "putting on ingredients..."))

     :make-pizza/bake
     (fn [_]
       (println "baking...")
       :done)}

    {:task-concurrency
     {:make-pizza/make-dough               2
      :make-pizza/make-sauce               2
      :make-pizza/put-ingredients-on-dough 1
      :make-pizza/bake                     4}}))

Suppose your ensemble of robots can make 2 doughs, 2 sauces, and bake 4 pizzas at a time. We've set the worker concurrency to reflect that capacity. So now, any simultaneous executions happening will try to fill up those workers before queueing starts.

Summary

In this tutorial, we've set up a make-pizza state machine on AWS Step Functions using Stepwise. We demonstrated the core API of Stepwise: ensure-state-machine, start-workers!, and start-execution!!. We also ran through some features of Step Functions: handling errors and parallel flow. As well as a couple features of Stepwise such as seamless state machine and workers development, and worker concurrency.

If you want to find out more about Step Functions or Stepwise, check out the AWS Step Functions web site or Stepwise repository.

Took me 4 years to realize we'd been orchestrating workflows

It's been more than 5 years since we founded Motiva. What we do fundamentally has been the same; helping companies send the most useful messages to the right people at the most convenient time. In this post, I'd like to discuss workflow orchestration and why I wish I'd known about it earlier.

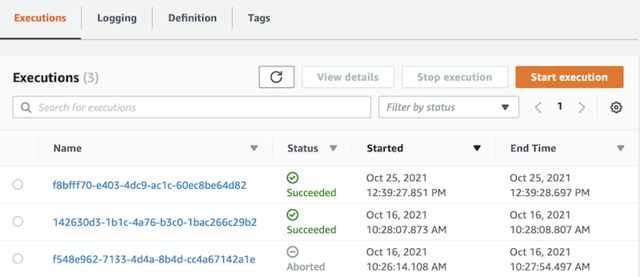
Here's a screenshot of one of our workflow execution histories (an execution = a specific workflow run). Not only is there status information to each step, but we also have a record of the input and output for every step. This granular tracking is valuable for diagnosis and the high-level visibility makes designing complex workflows managerable. We process hundreds of executions per hour and each execution handles up to a couple millions of small decisions by interacting with internal and external systems.

SFN sample execution view

Let's run through the evolution of our Process Batch workflow from the beginning to illustrate how we got to this point, using a sample of the typical kind of job we regularly perform at Motiva.

The task is to send certain emails to particular email addresses (contacts).

We aren't MailChimp though. One of our product's selling points is that our machine learning can determine the most useful* messages for the right people. Thus, identifying which particular emails to send to whom and at what time is the real work of this Process Batch workflow.

We query our machine-learning engine to map the "most likely useful" asset to each target. This defines what needs to be done for each batch.

From the list of email addresses, we need to:

  • know when to send to each contact
  • know which email variation to send to each contact
  • send out all the emails accordingly

Typically, this list of email addresses are contacts that either signed up for a particular newsletter or registered for a particular product. Thus, they are contacts with a history of engaging with our clients; providing a history of data for our machine-learning models to optimize on... but that's another story.

This Process Batch workflow comprises 3 activities:

  • scheduler -- enables you to do something at a specific time
  • asset picker -- chooses the email to be sent for each individual
  • sending out the emails

Quick and dirty first version

We built our first system in a few weeks as a service-oriented architecture. The system includes an email Campaign Orchestrator service, a Machine-Learning service, and an Email-Sender service, which all communicate via HTTP. I added a cron job onto our server to ping the Campaign Orchestrator service every few minutes. On receiving this heartbeat ping, the Campaign Orchestrator service would query our database table of schedules and create batches ready to be sent.

Here's a sequence diagram of the interactions between the services for this Process Batch workflow.

sequence diagram

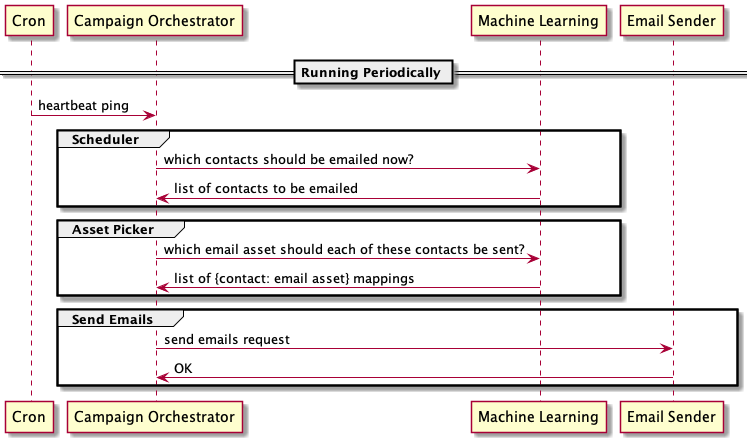
This 2016 version didn't last long though. The biggest problem was that since actions were performed in an impromptu manner, we had no observability when things weren't working for any reason. To diagnose which branch of logic a workflow took, I had to match our logs with database records to step through logical forks one by one. It was a slow and tedious chore. We had many basic reliability issues in our early days. I still recall having to debug a production problem after a few drinks around Christmas time while my CEO and one of our clients was waiting on the line -- a stressful experience that I gave a talk on last year.

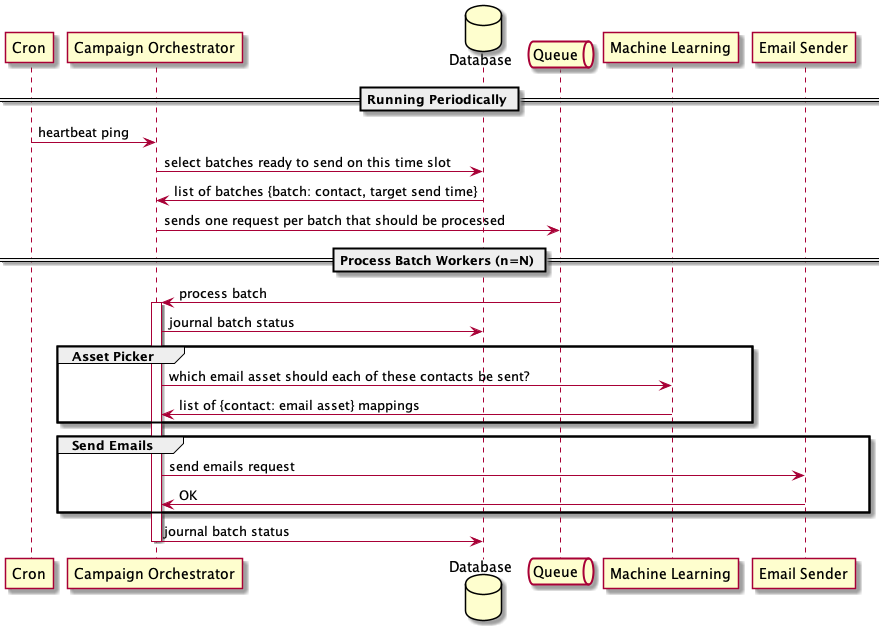
Materialize batches for observability

Naturally, the improvement needed was to materialize all the impromptu events as database records ahead of time and determine everything beforehand. It meant, for example, that instead of doing a query of the system at each time interval, working out what needs to be done and processing the batch on the spot, we do all that at the beginning of a campaign once and for all. What this translates to in terms of easier diagnostic is that we can query our database for what decision was made at any point of interest in a workflow. It's a deterministic system that goes straight for the win.

sequence diagram

There are two major changes to this second version.

  • we moved the scheduler out of the Process Batch workflow to run only once per campaign
  • all campaign batches are determined and materialized in advance

In this scenario, our Process Batch workflow has split into two workflows. The first part is the Activation workflow, which happens once and only once when the user finishes configuring a campaign. During this Activation workflow, the Campaign Orchestrator assign send-time schedules to every contacts; for example, Contact A should be emailed at 9am and Contact B should be emailed at 3pm.

Our Process Batch v2 workflow is still regularly triggered by a cron job. But instead of needing to determine which batches to send impromptu, we simply query our database for these pre-scheduled batches that are ready to be sent.

This second version lasted a few more months. But as our product was getting more use from our customers, we needed to scale the workflow. Particularly as some batches could take many minutes to process, whereas others would take only seconds. We needed a way to ensure that all batches get processed in reasonable time.

Message-based architecture for scaling

We chose to add a queue to our Process Batch workflow in order to choreograph batch worker allocation. Each Process Batch request was created as an independent message and put into the Process This Batch queue. When we needed to process a batch, we sent a Process Batch message with the required data to the queue. To respond to these messages in the queue, we had N number of deployed workers in the Campaign Orchestrator service subscribing to the queue.

That's a lot of words. Perhaps it's easier with a diagram. Note the addition of the Process This Batch queue.

sequence diagram

Scaling

Scaling was simply a matter of deploying more workers to increase the N value. Luckily, we kept our components and services decoupled, so scaling was easy. Additional benefits from placing our Process Batch workflow in a queue were:

  • failure handling
  • high-level observability

Failure handling

In the previous v2 version of this workflow, we needed to explicitly scan our database for failed batches in order to recover them. With this queue-based v3 workflow, the corresponding message for a failed batch was simply not acknowledged and the message would automatically be put back into the queue to be processed again. The big caveat here is that batches need to be idempotent so that processing the same batch more than once doesn't cause any unexpected behaviour.

Observability

With Process Batch requests going through an actual queue within our infrastructure (as opposed to an in-process queue), we achieved high-level monitoring. We configured various alarms in our queue metrics (i.e., CloudWatch alarms on AWS SQS metrics) such as "age of oldest message in the queue in a 5-min period", "number of messages sent in a period", and "number of messages received in a period". Such alarms provided an overview of the health of our Process Batch queue, and by extension, the health of our Process Batch workflow. These metrics replaced a few database queries that we used to run to get similar data.

Meanwhile, as the demand for our product grew, we scaled our other workflows by using this setup and created numerous queues in the process. Over the following couple of years, we moved to an entirely message-based architecture. Below is our extended Process Batch v3.1 workflow where the intra-system calls -- both to the Machine-Learner and the Email Sender -- were communicated through their own respective queues.

sequence diagram

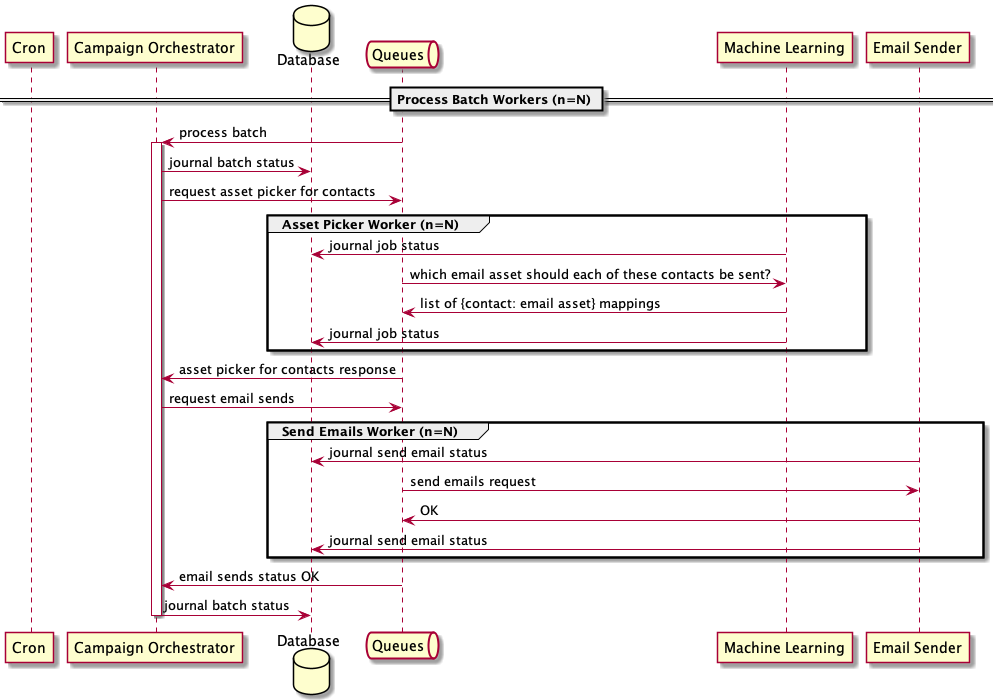
The database journal writes for each worker constitute a small but significant addition to the above graph. What's shown here is a simplistic illustration. This database action could mean writing actual database journal records to log job status, or more often, the transactional reversion of database writes if a job fails. These actions are important because we spent a lot of time accounting for steps failing in different parts of a workflow. Keeping track of each step facilities easier diagnostics.

A more accurate view of our Process Batch v3.1 workflow looks like this:

decision diagram

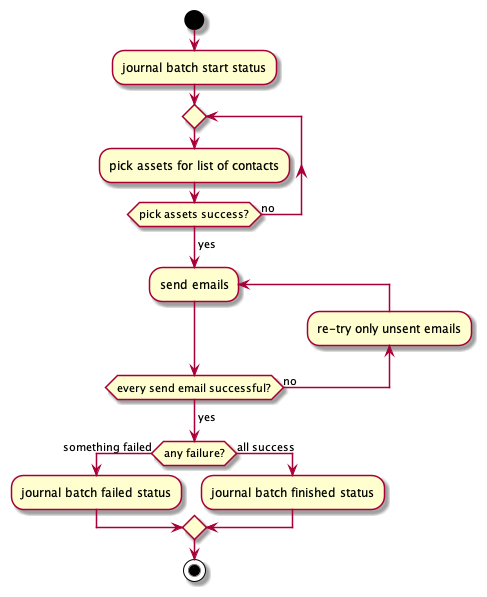
Using this messaged-based architecture, we handled a growth of 400% serving a handful of Fortune 500 companies, supported by a team of only 2 backend engineers. Even so, this version still wasn't good enough. Our product was still experiencing unexpected issues every few weeks.

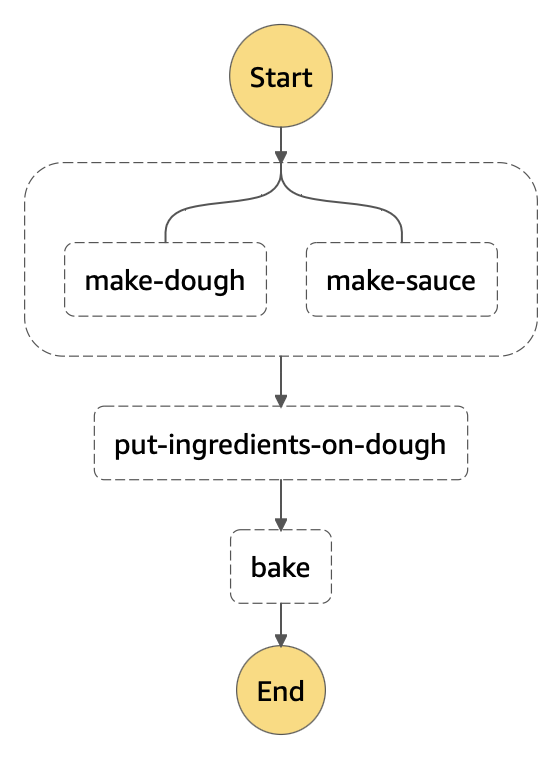
If only we could have finer-grained control of our workflows to account for even more state transition cases, we thought. But as you can see, even this simplistic decision diagram above is already a bit confusing even after omitting a few details including re-try limits and parallelization. Our increasing reliance on managing states between asynchronous queue workers was getting tedious and hard to manage. We were violating the 'don't repeat yourself' principle with our boilerplate operational application code and system infrastructure.

The Send Emails validation step in the above decision-flow diagram, for example, creates a decision path in our Process Batch workflow. If all emails were successfully sent, we proceed normally, but if any of the emails failed to send, we break off to an alternate path to re-try only the unsent emails. I coded this path with 2 separate workers over 2 separate queues; one paired worker and queue for the happy path, and a second pair for the failed path. Every extra decision in our workflow therefore became yet another worker and queue pair. With this naive implemenation, our need to impose finer-grained control of our workflows was becoming unmanageable.

Application Workflow Orchestration is a solved problem

What we needed was an application workflow orchestration engine. All those distinct queues we created to cover every decision path and the database journals used to keep track of step statuses are boilerplate logic for solving a known problem. Take a look at AWS Step Functions for an example of a workflow orchestration engine as a service. It's also what we ended up using for production.

AWS Step Functions is a low-code visual workflow service used to orchestrate AWS services, automate business processes, and build serverless applications. Workflows manage failures, retries, parallelization, service integrations, and observability so that developers can focus on higher-value business logic.

These feature -- manage failures, retries, ... and observability -- match the exact operational requirements that I've been building up to in this blog post and in our actual system.

It's worth pointing out that there are plenty of other workflow orchestration engines to choose from. AWS Step Functions just happens to fit our particular use cases.

Failure handling as decision paths

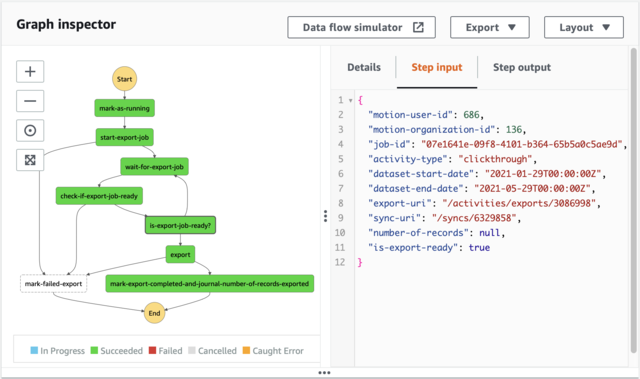
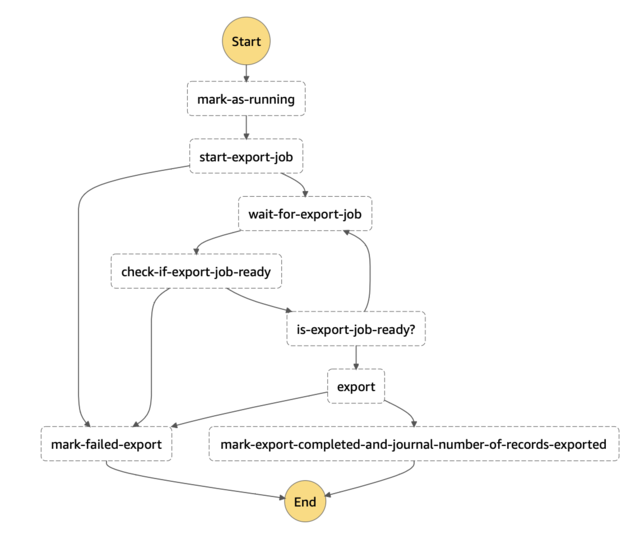
Below is a screenshot from the AWS Step Functions UI on one of our workflow definitions. Defining a workflow is simply a matter of writing a JSON definition (in our case, we use Stepwise, an open-source Clojure library on AWS Step Functions) to specify the state transition logic. All the boilerplate operational aspects, including creating implicit queues and tracking execution history (see next section), are taken care of for you. In this diagram alone, I would have needed to create 7 queues and 8 sets of status records for this workflow. I can't stress enough how the freedom from needing to explicitly create an endless number of queues and journal entries is a huge time saver!

SFN export workflow

Along with a JSON workflow definition to create this state machine, you have to assign workers to each of the steps. We simply re-used our existing workers because our system had alredy been implemented as a message-based architecture.

Once you have your workflow definition and workers assigned, Step Functions will automatically route output from one worker as input to the next according to the logic in your workflow definition. Routing options such as timeouts, re-tries, and route by output values are all available.

Monitoring 2.0: History for each execution

High-level CloudWatch metrics such as step failure counts over time are provided. These metrics are equivalent to the queue metrics mentioned previously. Moreover, Step Functions also provide a complete step-by-step history for each individual execution! This is valuable as it enables non-developer on the team to inspect particular executions for customer support.

I hope this has been a useful summary of our application business workflow management journey. In the next post, we will dive into our Stepwise library to illustrate how to set up and execute an AWS Step Functions workflow.

continue   →